VeraLab LDAP Configuration Guide
This guide is for VeraLab administrators who want people to sign in with their LDAP directory credentials. It walks you through configuring LDAP authentication for both the VeraLab web application (employee logins) and the VeraLab client on lab workstations, using a Windows-based OpenLDAP server as a working example.
When you finish, employees can log in to the web application with their LDAP accounts, and users of your lab computers sign in through the VeraLab login screen with the same directory credentials.
How VeraLab Uses LDAP
VeraLab Suite is a client-server application with two main components: a web-based application and a client software agent.
The web-based application provides real-time statistics dashboards, workflow automation functions, reporting and application administration. Once the VeraLab server installation is complete, open a browser and go to http://yourservername:8080/veralab.
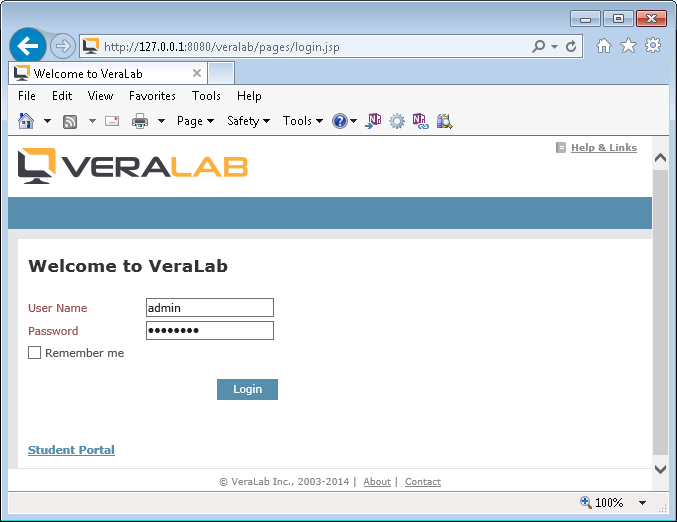
Note: VeraLab Server comes with a built-in Administrator account, admin. The default password is password; we recommend changing it right after the installation.
The client software agent has no front-end interface. It monitors client events, such as users logging in and out and applications opening and closing, and responds to server commands. It can also add an authentication layer if your client computers do not have one yet:
- If you already have an MSAD-integrated environment, where users log in to Windows with their Active Directory credentials, the VeraLab client simply registers user log in and log out events.
- If your lab is open to the public and you have no control over who can use its computers, the LDAP-enabled VeraLab client adds a custom authentication layer.
The only prerequisites for that setup are network connectivity from the VeraLab Server to your LDAP directory server and the LDAP configuration properties described below.
Installing and Configuring OpenLDAP
For demonstration purposes, this guide uses the Windows-based OpenLDAP software available from the Userbooster site. Follow the vendor's installation instructions, or skip this section if you already have an LDAP directory installed and configured on your site.
You can accept all of the defaults in the installation guide. Once the installation is complete, check that the OpenLDAP service is up and running in Windows Services.
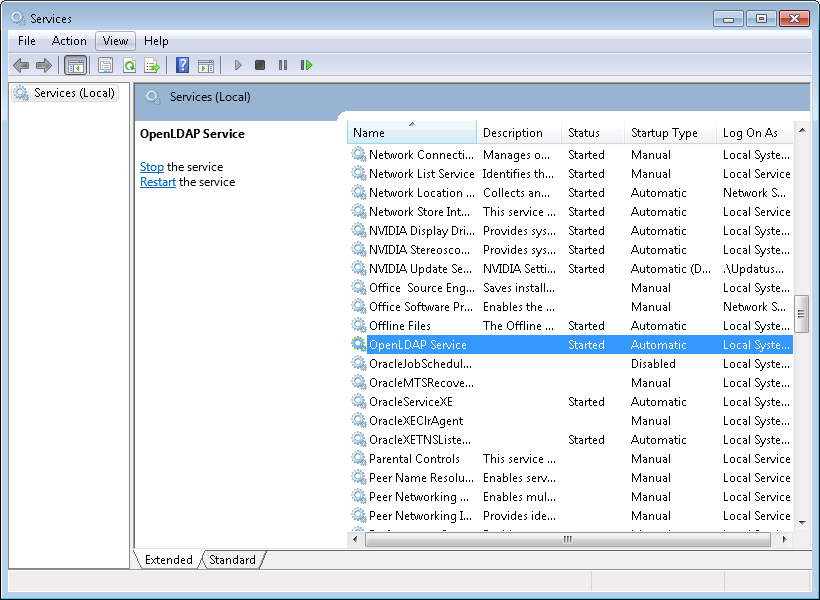
To add and modify user accounts in the OpenLDAP directory, this guide uses the LDAP Admin client tool, available from ldapadmin.org.
- Create a new connection to the OpenLDAP server you just installed: click the Connect icon, then New connection.
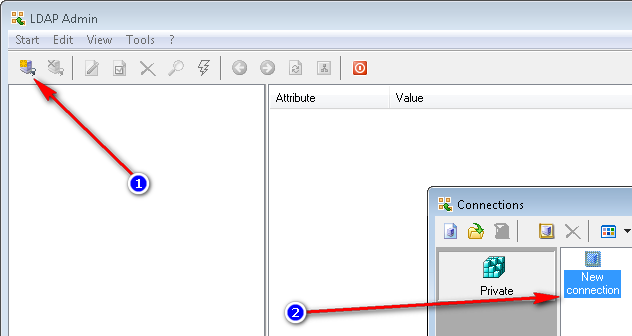
Creating a new connection in LDAP Admin. - Enter your OpenLDAP server connection details, such as the connection name and the host name or IP address. The default admin account that comes with Userbooster OpenLDAP is:
Field Default value User cn=Manager,dc=maxcrc,dc=comPassword secret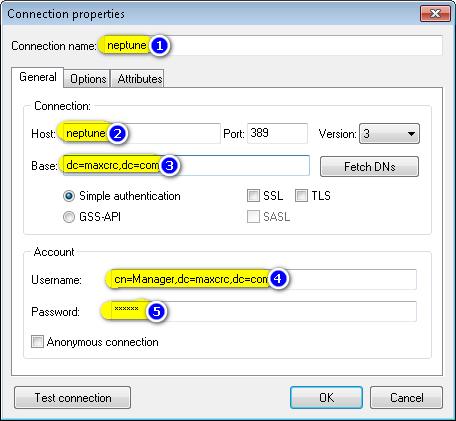
Connection properties for the OpenLDAP server. - Connect to OpenLDAP using the newly created connection.
- OpenLDAP comes with no user accounts other than the built-in Manager, so add a few test accounts.
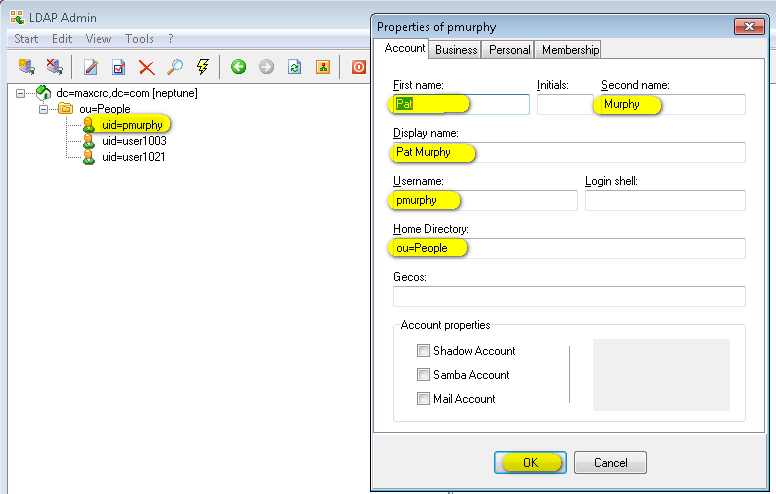
Adding a test user account in LDAP Admin. - Once you add an account, right-click it and select Set Password.
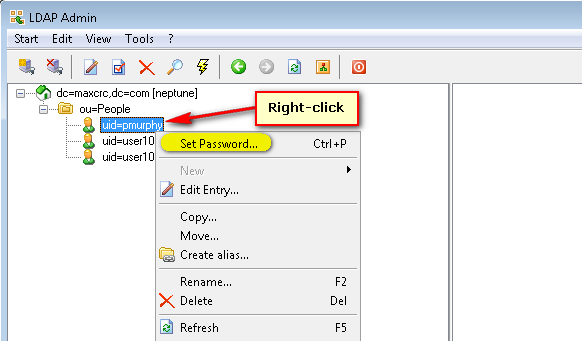
Setting the password for the test account.
Now you are ready to configure VeraLab with OpenLDAP.
Configuring the Web Application to Use LDAP
These steps let employees log in to the VeraLab web application with their LDAP credentials.
- Log in to VeraLab as the
adminuser and go to Tools → Settings. If you have only one LDAP directory and all of your user accounts are stored in a single subdirectory, you can reuse Common LDAP Settings for both the client LDAP configuration and employee web application logins.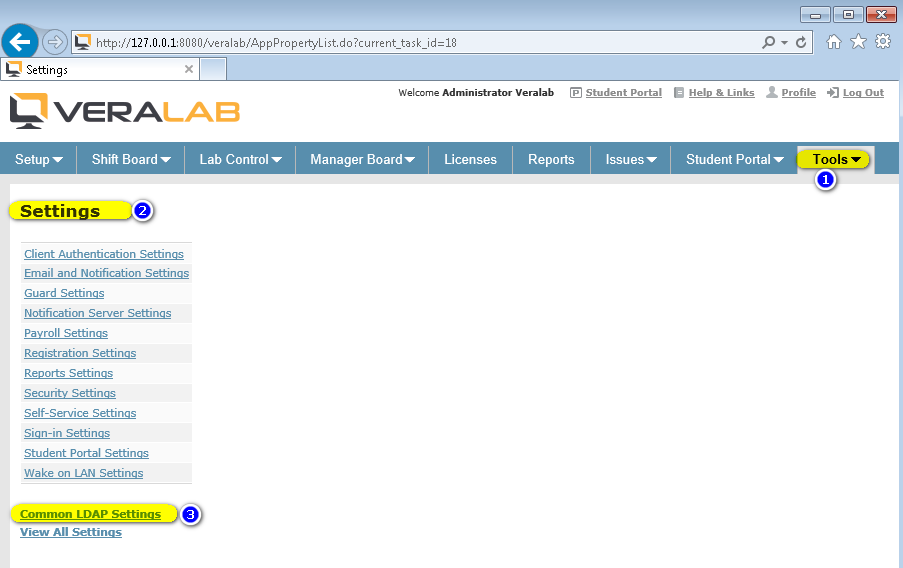
Tools → Settings, with the Common LDAP Settings link at the bottom. - Click Common LDAP Settings. Enter the LDAP Server URL, the path to the directory where user accounts are stored and the user unique identifier attribute (usually
uid,cnorsAMAccountName). After testing and verifying the connection to LDAP, click Save.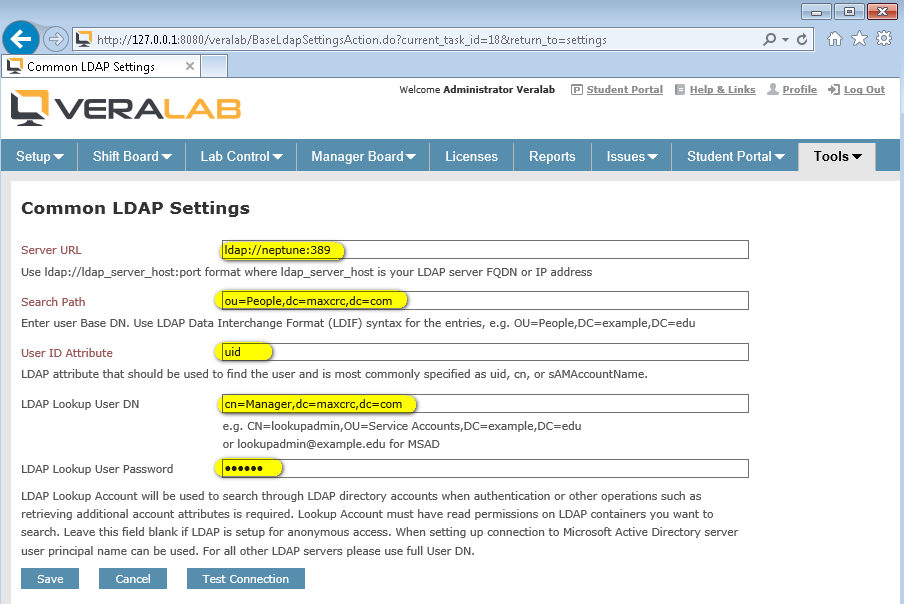
The Common LDAP Settings form, filled in for the OpenLDAP example. Field What to enter Value in this example Server URL ldap://ldap_server_host:port, whereldap_server_hostis your LDAP server FQDN or IP addressldap://neptune:389Search Path The user Base DN, in LDAP Data Interchange Format (LDIF) syntax, e.g. OU=People,DC=example,DC=eduou=People,dc=maxcrc,dc=comUser ID Attribute The LDAP attribute used to find the user, most commonly uid,cnorsAMAccountNameuidLDAP Lookup User DN The lookup account, e.g. CN=lookupadmin,OU=Service Accounts,DC=example,DC=edu, orlookupadmin@example.edufor MSADcn=Manager,dc=maxcrc,dc=comLDAP Lookup User Password The lookup account's password. Leave blank if LDAP is set up for anonymous access. The Manager password Note: the LDAP Lookup account is used to search through LDAP directory accounts when authentication or other operations, such as retrieving additional account attributes, are required. It must have read permissions to search and retrieve account attributes in the LDAP containers you want to search. For Microsoft Active Directory you can use the user principal name; for all other LDAP servers use the full user DN.
- To enable LDAP authentication for employees, go to Setup → Users. If you installed VeraLab with the demo data you will see many seeded accounts; if you installed without it, you will see only the one Admin account. At this point these are all Native accounts.
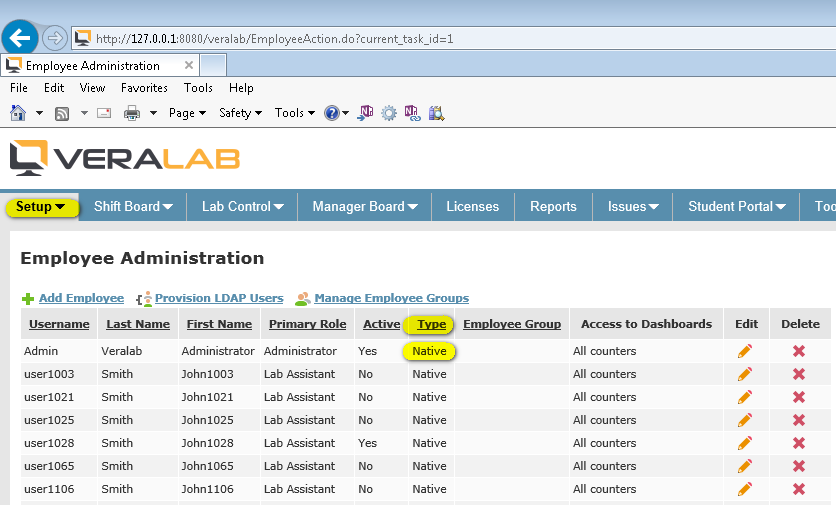
Employee Administration: all accounts are Native before LDAP provisioning. - Click the Provision LDAP Users link, then click the LDAP Settings link.
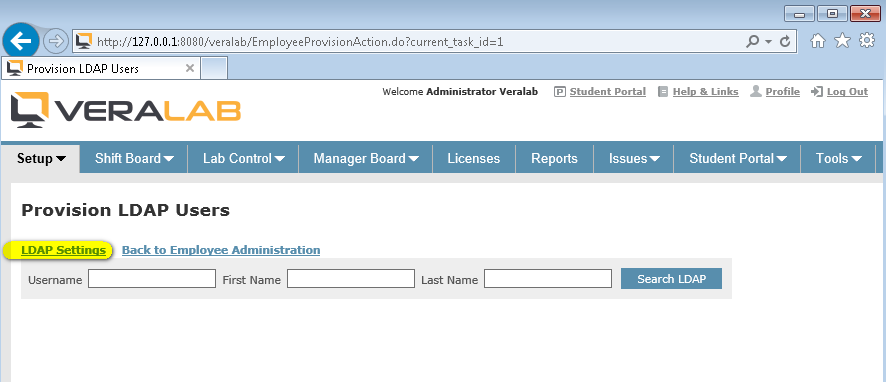
The Provision LDAP Users page. - Select Inherit from Common Settings, or Do not inherit from Common Settings to override the common settings with new values.
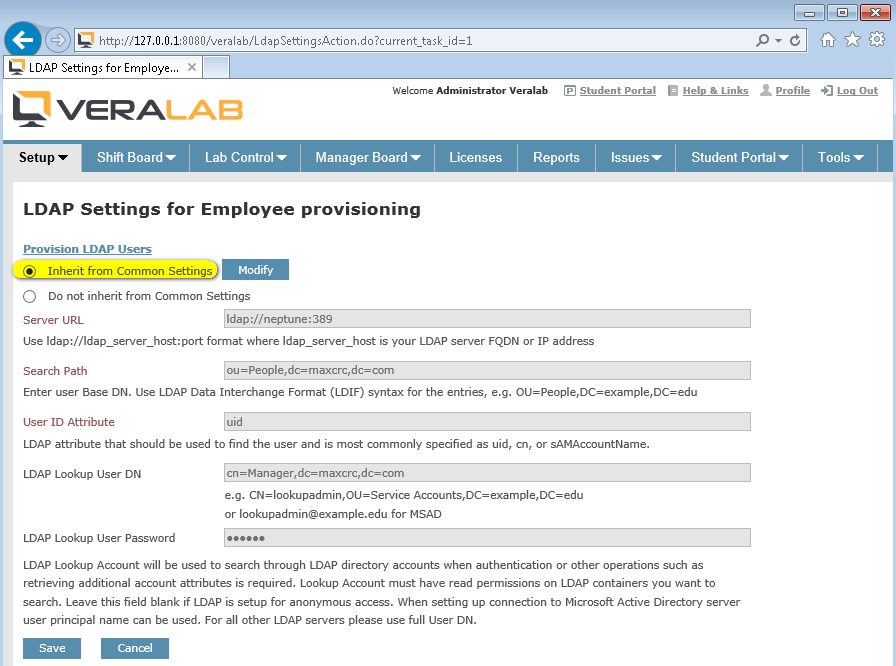
LDAP Settings for Employee provisioning, inheriting the common settings. - The second option, Do not inherit from Common Settings, is needed if you use a different LDAP server or directory container for employee records. If you made any changes, click Test Connection, enter any valid account credentials and verify that the test connection is successful.
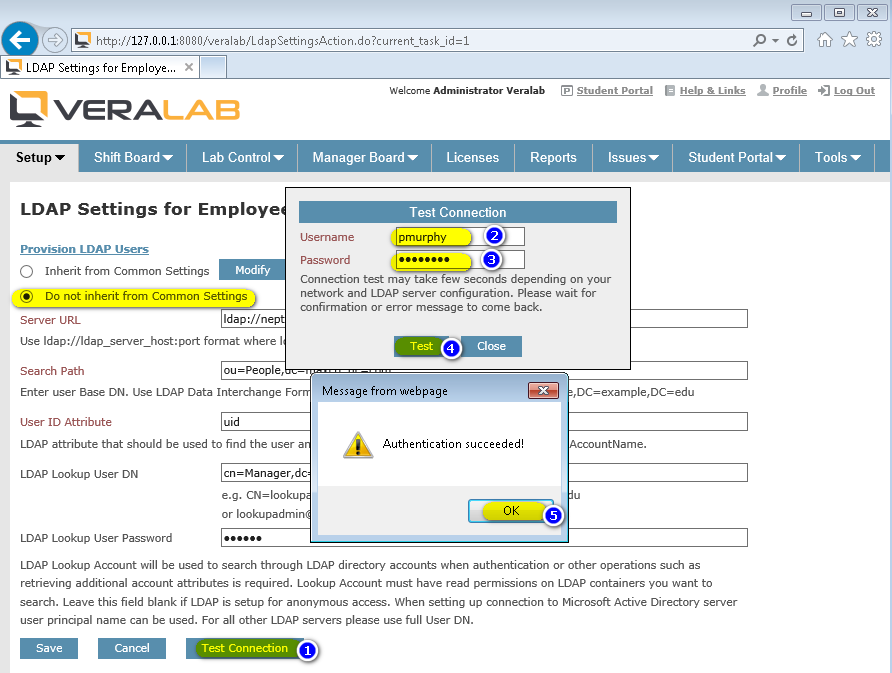
Testing the connection: Authentication succeeded. - Click Save and return to the Provision LDAP Users screen.
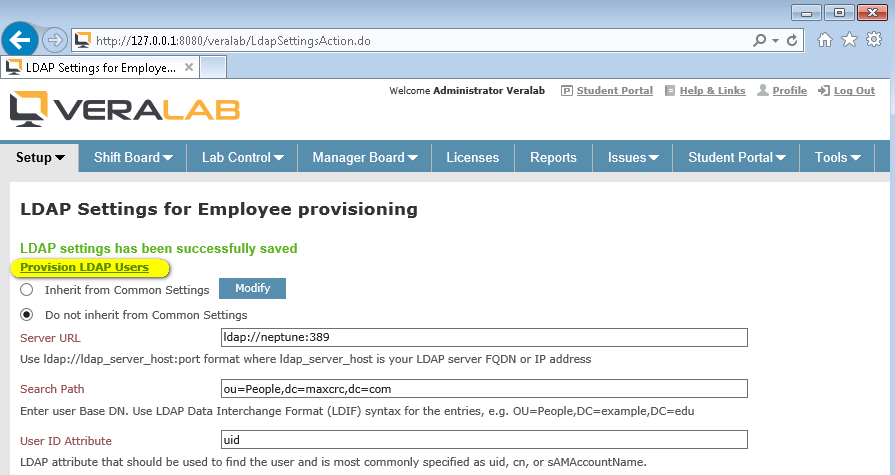
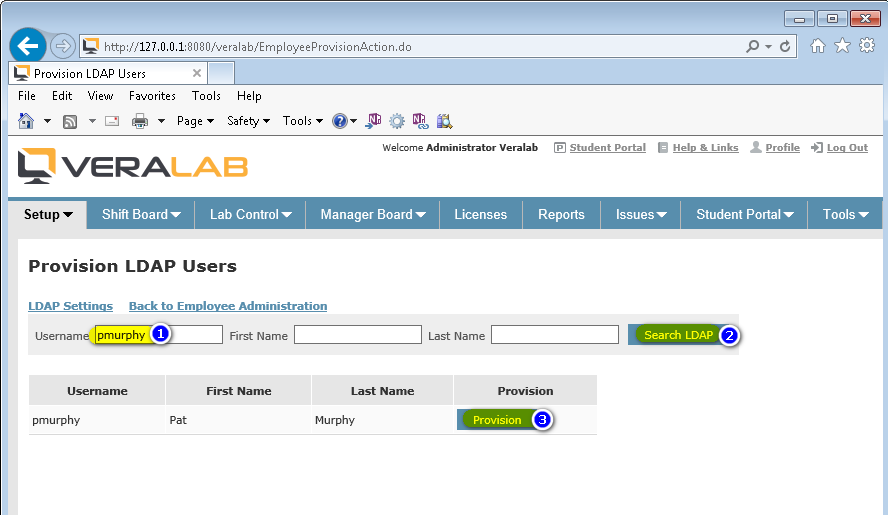
Settings saved; follow the Provision LDAP Users link back. - Enter a username, first name or last name as search criteria and click Search LDAP. If a user record is found, it appears in the results. To provision the user, click Provision.
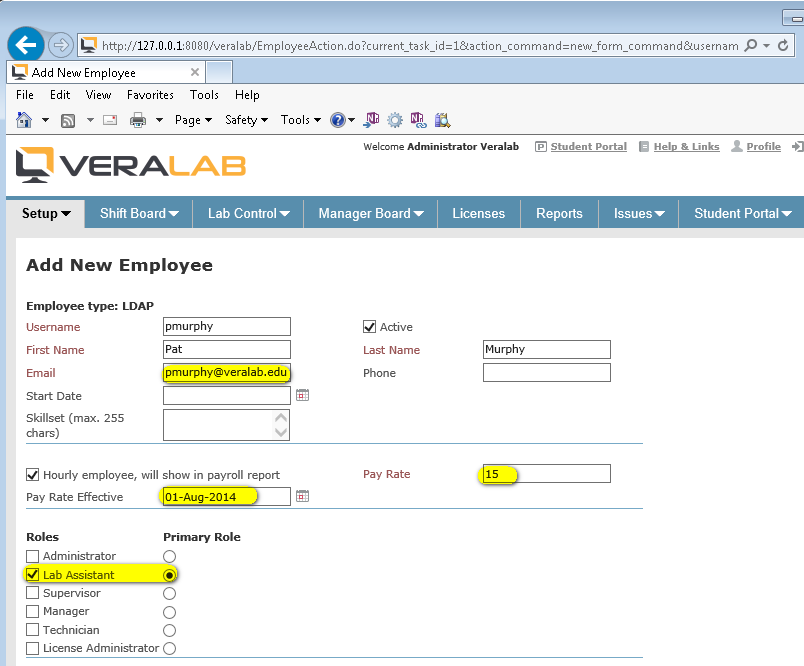
Searching LDAP and provisioning a user. - A new page opens. Fill out the required fields and assign roles and other permissions to the newly created user.
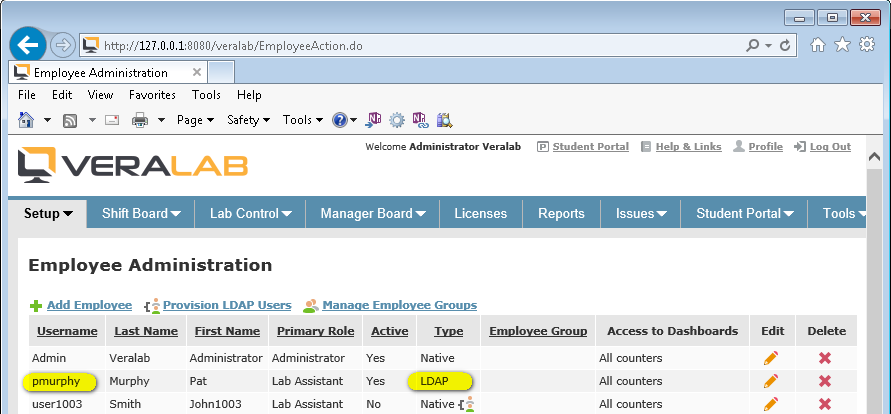
Completing the new employee record and assigning a role. - The new user appears in the list of employees with the account type LDAP.
The provisioned employee, now listed as an LDAP account. - Log out and log back in to the VeraLab web application with this account and the password that was set for the user in OpenLDAP.
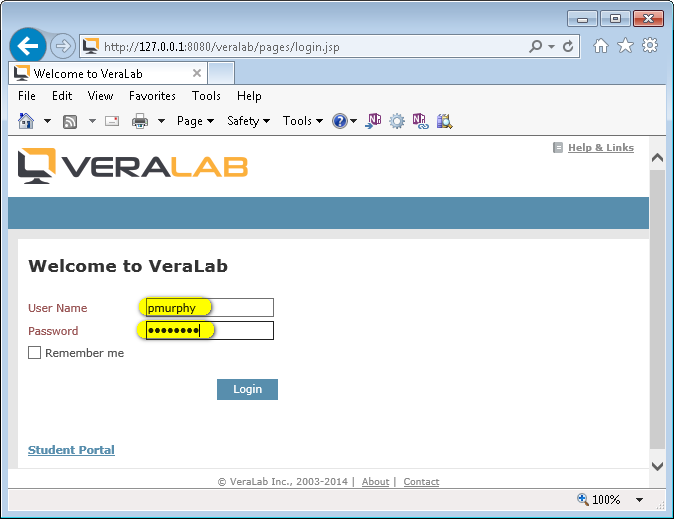
Logging in with LDAP credentials. - The user's landing page is displayed; for the Lab Assistant role, for example, it is the Shift Panel page.
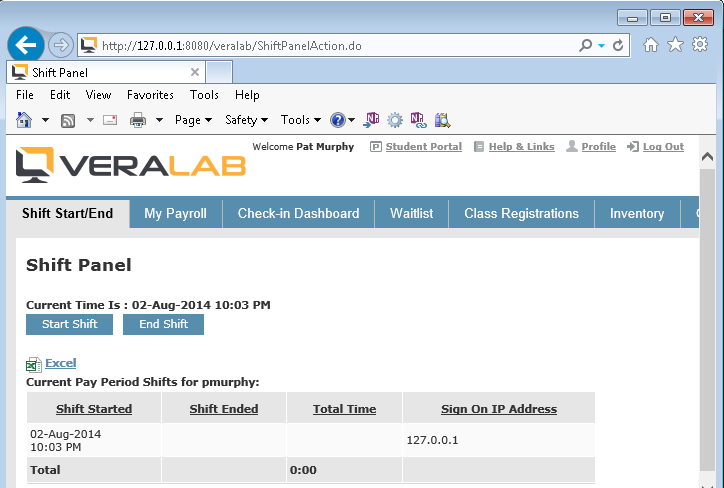
The Shift Panel landing page for a Lab Assistant.
Configuring the VeraLab Client for LDAP Authentication
These steps make lab workstations show the VeraLab login screen, where users sign in with their LDAP credentials.
- Enable Windows automatic logon on your Windows clients if it is not enabled already. For Windows 7, you can refer to this Microsoft article on automatic logon.
- Enable LDAP authentication for client stations: log in to the web application and go to Tools → Settings → Client Authentication Settings.
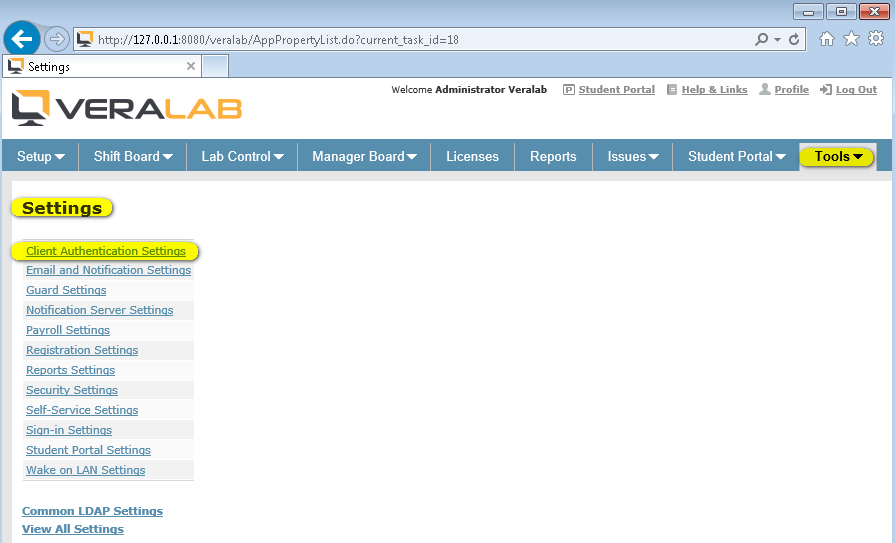
Opening Client Authentication Settings. - Enable client authentication and click Update Settings.
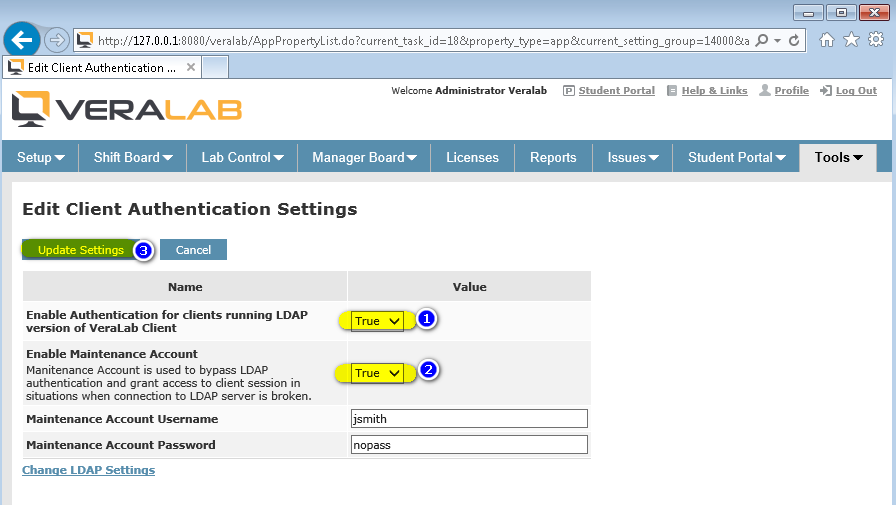
Edit Client Authentication Settings. Setting Description Enable Authentication for clients running LDAP version of VeraLab Client Set to True to require LDAP credentials on client workstations. Enable Maintenance Account Set to True to allow a maintenance account to bypass LDAP authentication. Maintenance Account Username User name of the maintenance account. Maintenance Account Password Password of the maintenance account. Note: the maintenance account is used to bypass LDAP authentication when the connection to the LDAP server is broken, or when you need to open a client screen without LDAP credentials, for example for a quick maintenance task.
- To use the Common LDAP Settings, or to change LDAP settings for clients, return to the same screen and click the Change LDAP Settings link.
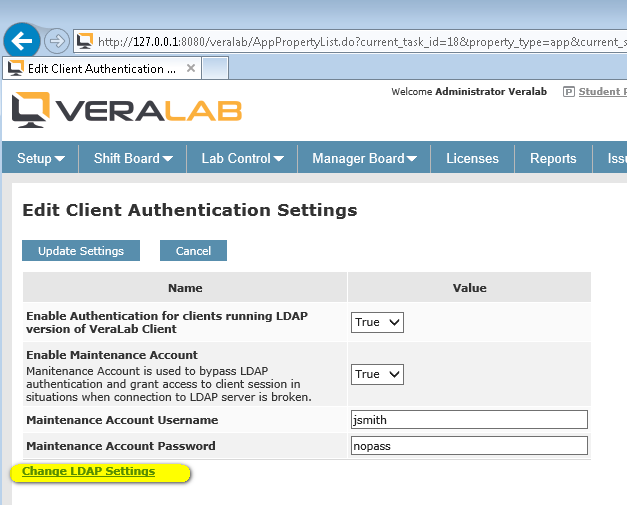
The Change LDAP Settings link. - Select the option you want and click Save.
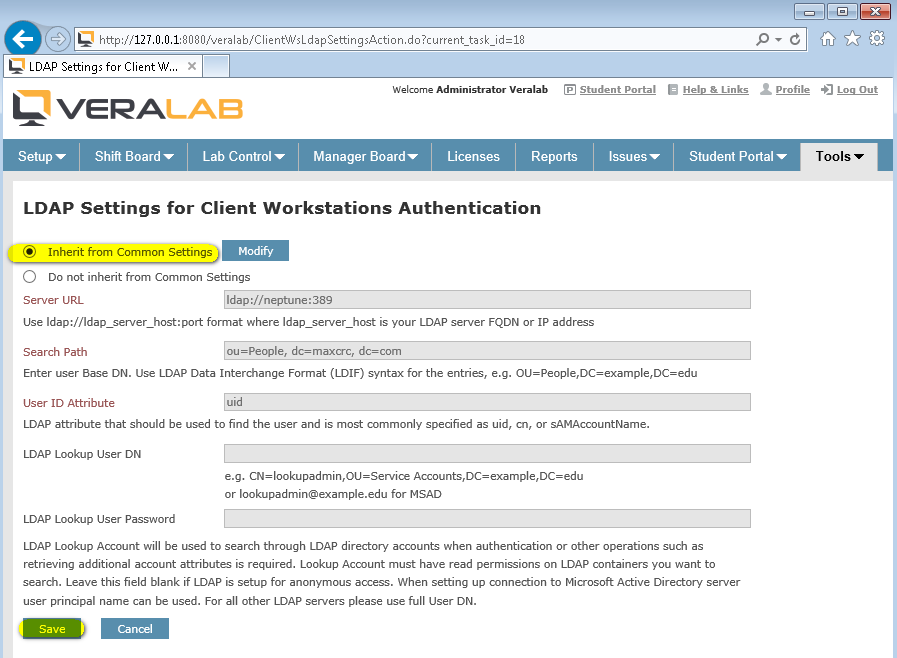
LDAP Settings for Client Workstations Authentication. - Download the LDAP-enabled client from the VeraLab downloads page. The LDAP-enabled client package comes with two files. Open
Autologon.ini, enter the credentials of the local Windows account you used for automatic logon in step 1, then save the file and exit.[autologon] username=<local account username> password=<local account password> - Run the setup package. Both files,
veralab_client_setup_ldap.exeandAutologon.ini, must be in the same directory when you start the client installation. You must install the VeraLab client as a user with administrator privileges. - Once installation is done, a new window opens automatically. Enter the VeraLab server connection details, such as the server name or IP address, and the Screen Unlock password. The Screen Unlock password is designed primarily for counter sign-on scenarios and is rarely used when LDAP authentication for client stations is enabled.
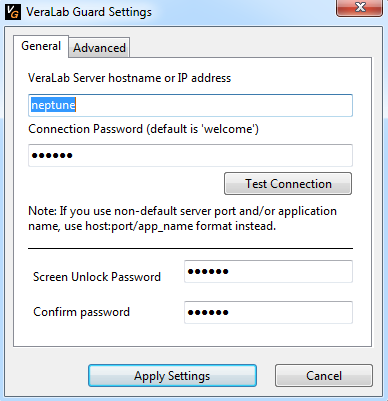
VeraLab Guard Settings: server connection and Screen Unlock password. - Register the client with the server by selecting the Room, Model and Image, then click Finish. Refer to the VeraLab Administrator's Guide for more information on setting up your VeraLab environment.
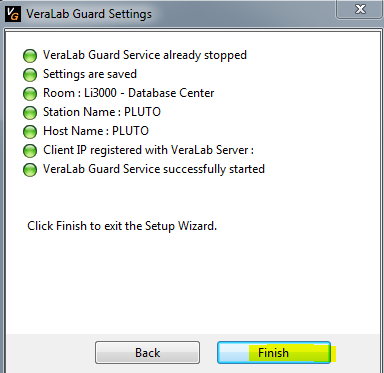
Client registration complete; click Finish to exit the wizard. - Now when you log out or reboot the client, you are presented with the VeraLab custom login screen and can use LDAP credentials to log on to the Windows session.
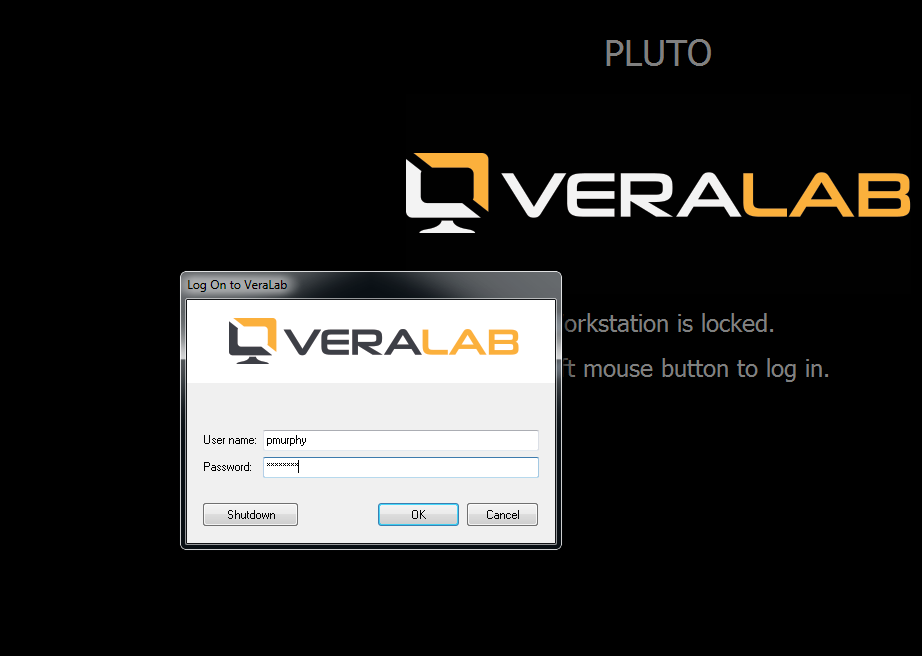
The VeraLab login screen on a client workstation. - To see client sessions, log in to the VeraLab web application and go to Tools → Monitoring.
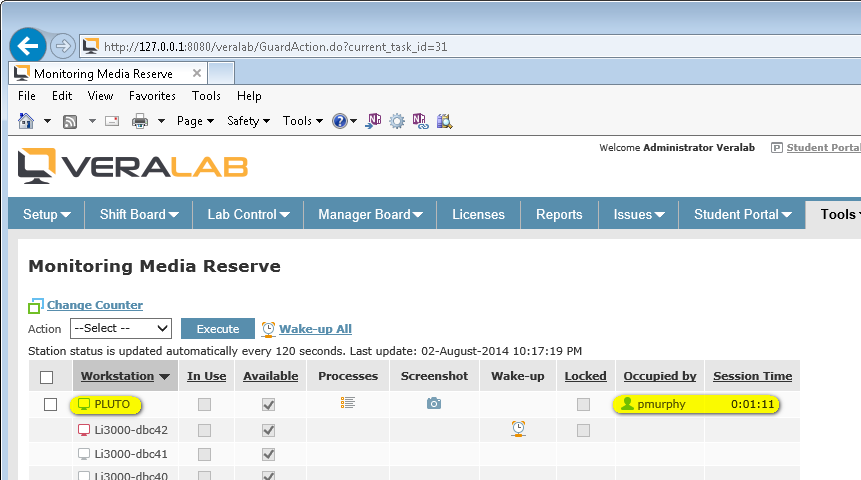
The LDAP user's session on the Monitoring page.
Getting Help
If you have any questions about LDAP configuration, please contact VeraLab Support at support@veralab.com or call 1-855-VERALAB (1-855-837-2522).
Related: VeraLab LDAP integration overview, LDAP and Active Directory sign-in scenarios, SSO integration with Microsoft Azure SAML and the VeraLab FAQ.