Remote Access to Lab Computers: Setup Guide
This guide is for lab administrators who want students and other lab patrons to connect remotely to lab computers. VeraLab Server 8.6.1 and higher includes Remote Access as a standard feature: VeraLab identifies available stations and publishes connection links for them. Stations that are occupied or otherwise unavailable are not displayed. Remote connections to both Windows and macOS computers are supported.
Where Remote Access Links Are Published
Once configured, remote connection links are published in three places in the VeraLab web application. You can choose which option to share with your lab patrons (students) or publish on one of your internal portal pages.
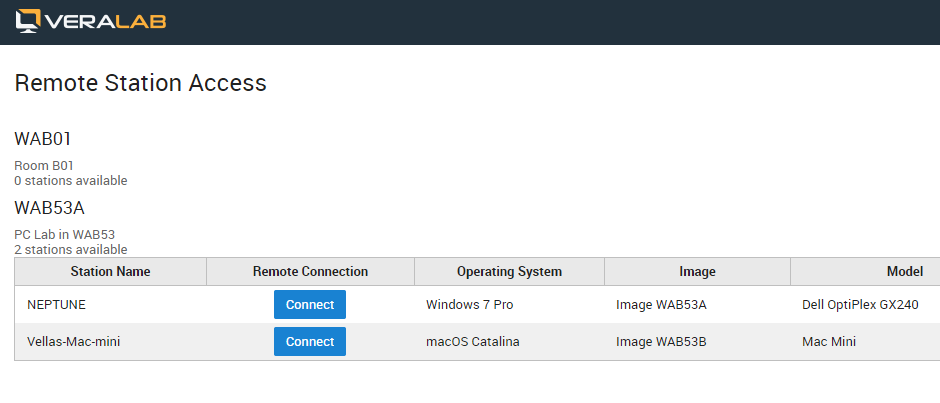
Option 1. Remote Access page
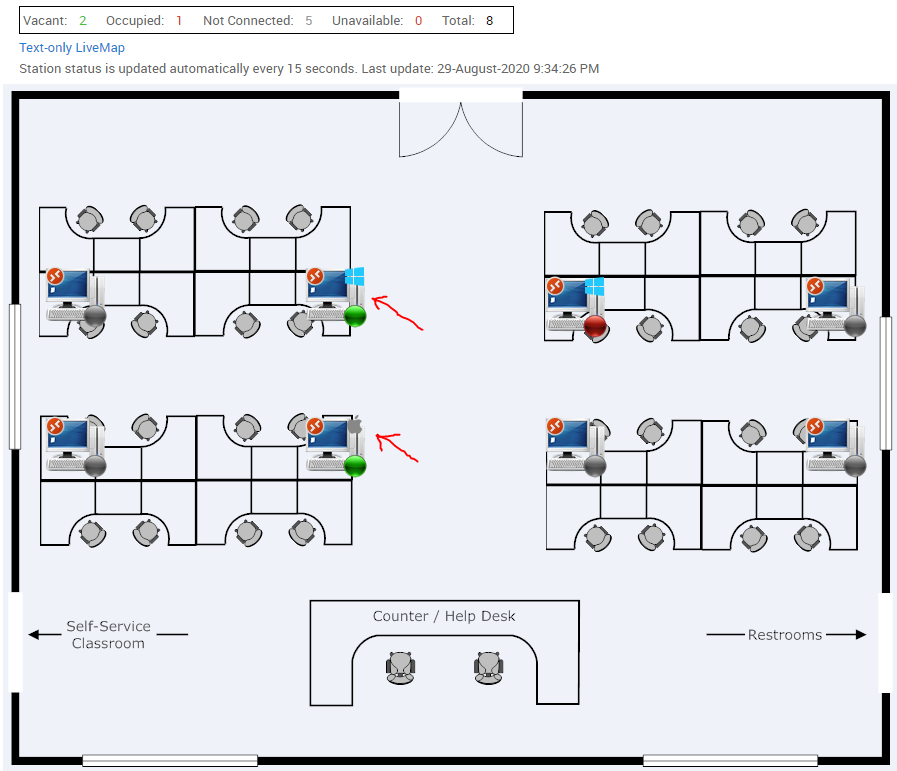
Option 2. LiveMap (on the Student Portal)
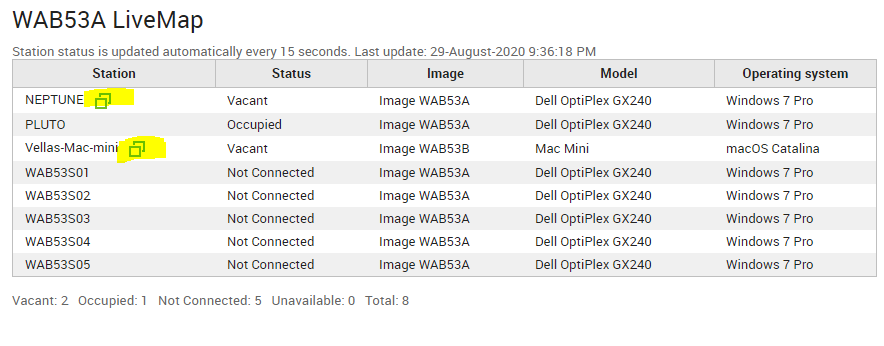
Option 3. Text-only LiveMap
Stations available for remote connection have an icon next to their names.
Setting Up Lab PCs (Windows) for Remote Access
- Review the official Microsoft documentation or quick setup reference: How to use Remote Desktop.
- Verify that the RDP port (default
3389) is open for ingress connections. - Verify that target PCs allow only one concurrent RDP connection, for example: Limit RDP connections to one user at a time.
Note: there is still a risk of users knocking each other's sessions off for various reasons. Usually, if another session requests a connection, a message on the active session screen lets the current user block the new connection. If it is not answered in time, the new session may take over.
Setting Up Lab Macs for Remote Access
- Review the official Apple documentation or quick setup reference: Turn screen sharing on or off.
- Verify that the VNC port (default
5900) is open from the network where your users will start Remote Access sessions. - Users connecting to Macs need VNC client (VNC Viewer) software.
Configuring Remote Access in VeraLab
Prerequisites
- Users can connect to your lab network via VPN or directly over the Internet (not recommended).
- VeraLab Server 8.6.1 or higher is installed and running.
- The VeraLab room property Sign-in Mode is set to Self Service.
- The correct images are defined and assigned to stations. The Operating System column takes its value from the image's Image OS field.
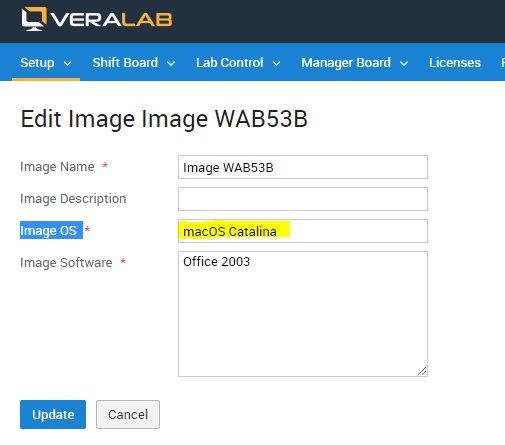
The Image OS field of an image supplies the Operating System shown for remote stations.
VeraLab setup steps
- Log in to the VeraLab web application with the built-in
adminaccount or any user account with the Manager role assigned. - Navigate to Lab Control → Remote Access.
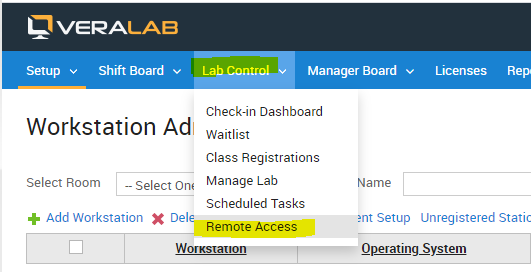
Lab Control → Remote Access. - Click Remote Access Settings to view or edit the global Remote Access settings.
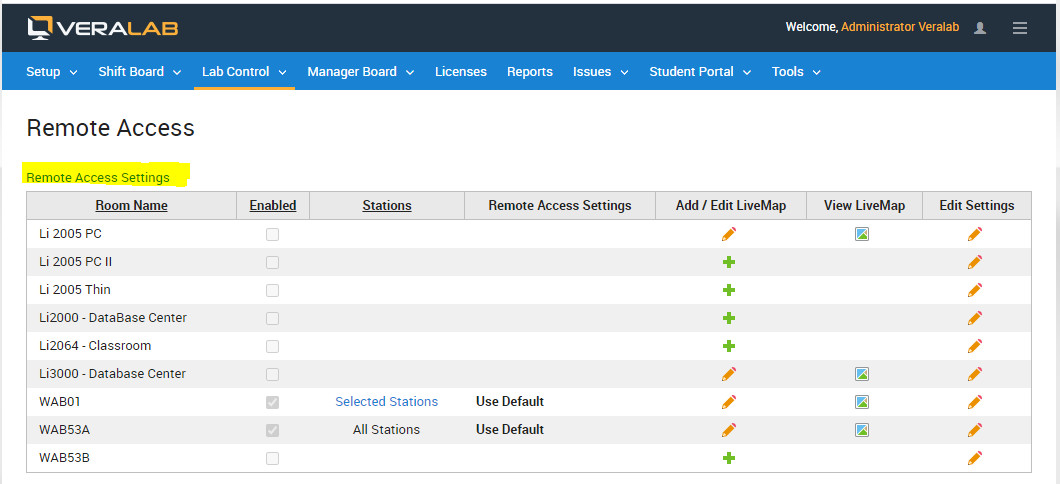
The Remote Access page lists every room; the Remote Access Settings link opens the global settings. - On the Remote Access Settings page, choose these options:
Setting What it does Show rooms with 0 available stations Select it if you want end users to see the entire list of rooms even if they have no available stations. Leave it cleared to display only rooms with available computers; if you have many labs and not all of them are configured for remote access, or all available computers in a lab are occupied, this keeps the list of available stations shorter. Establish connections: via IP Address / via Hostname (FQDN suffix) Use the IP address or the hostname (or fully qualified domain name). It is embedded in the connection link published to users and must be resolvable on the network or VPN. For hostnames, add your domain suffix: VeraLab takes the station name and appends the suffix to form the FQDN. If your stations do not have FQDN resolution in the campus network, select IP Address. Remote Desktop Gateway Keep this field blank if you use direct access and have port 3389open on client stations.VNC Password for Macs Mac stations require a VNC password, and this setting must match the client VNC password. Macs must run macOS Mountain Lion or higher. To set the VNC password on clients, go to System Preferences → Sharing, turn on Screen Sharing, then open the Computer Settings dialog and set the password for VNC connections there. 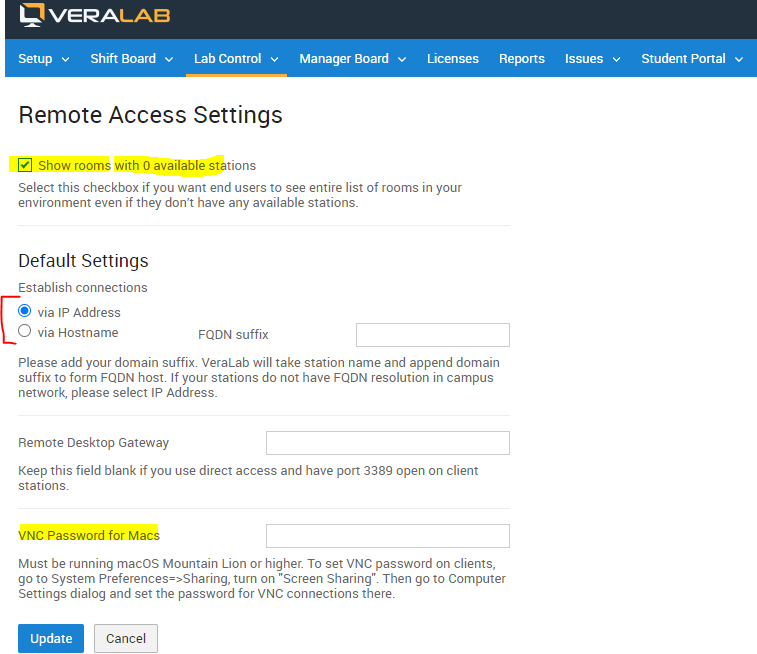
Global Remote Access Settings. - You can turn Remote Access on or off, and edit, override and fine-tune the default settings, for each room. On the Remote Access page, click the Edit icon to view and edit a room's remote access settings.
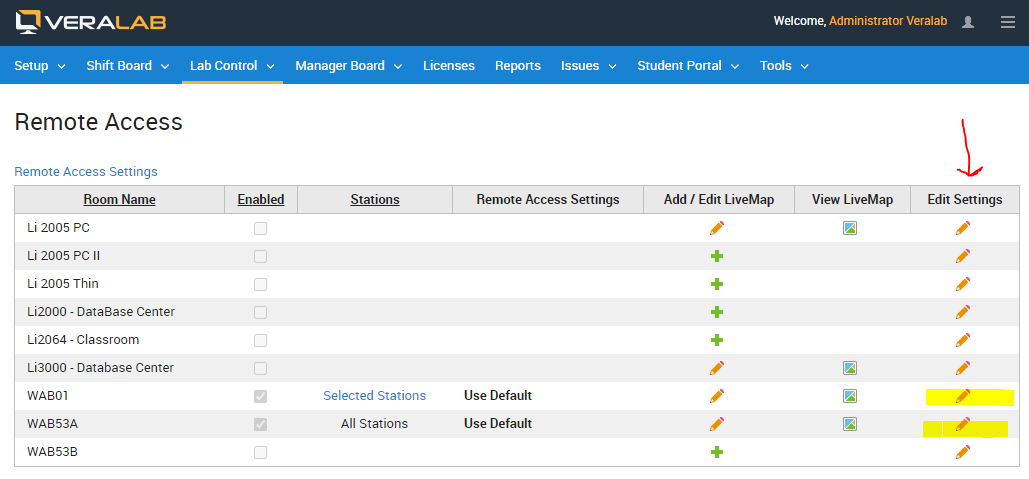
Use the Edit Settings icon to change a room's remote access settings. - To make only specific stations available for remote access, select the for selected stations option and click Select Stations. A pop-up window opens with the list of stations in the room. Select the stations you want, click Update, then click Close to close the pop-up window.
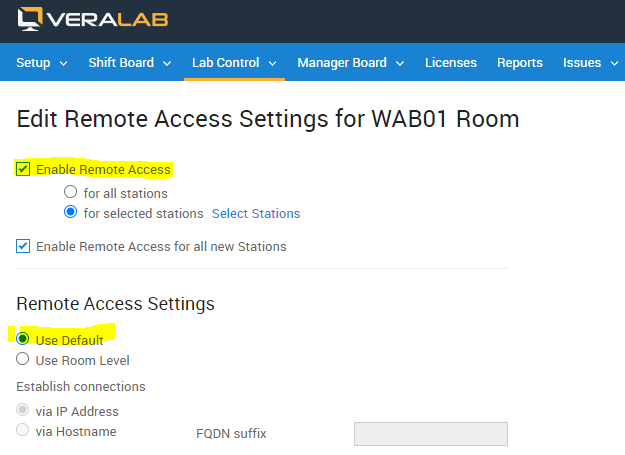
Room-level settings: enable Remote Access for all or selected stations, and use the default or room-level connection settings. 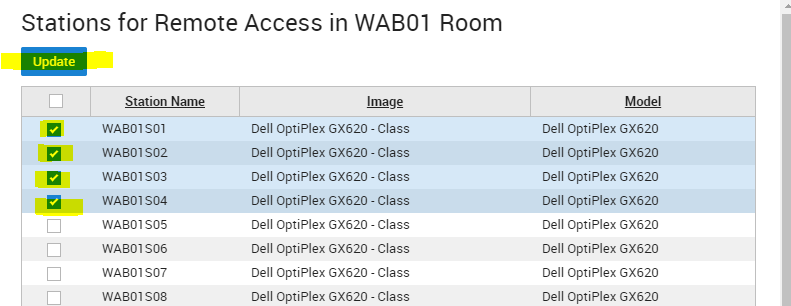
Select the stations to make available, then click Update. - To display Remote Access on Live Maps, the room must have a LiveMap added and configured. You can do this directly from the Remote Access configuration page or from the LiveMaps menu (under the Student Portal top menu). Rooms with a LiveMap configured show an icon in the list of rooms.
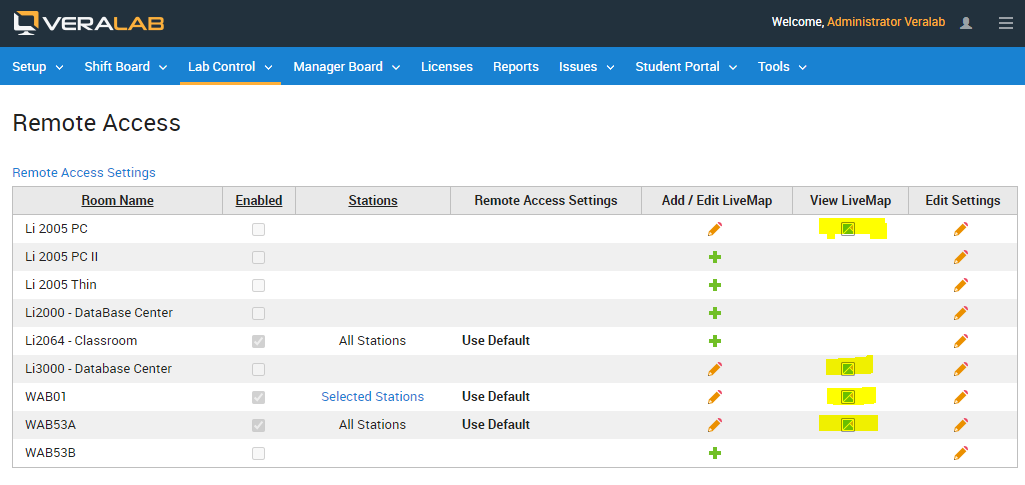
Rooms with a LiveMap configured show a View LiveMap icon. - Click the Add/Edit LiveMap icon to configure the room's LiveMap and select the stations that show on the LiveMap page for that room.
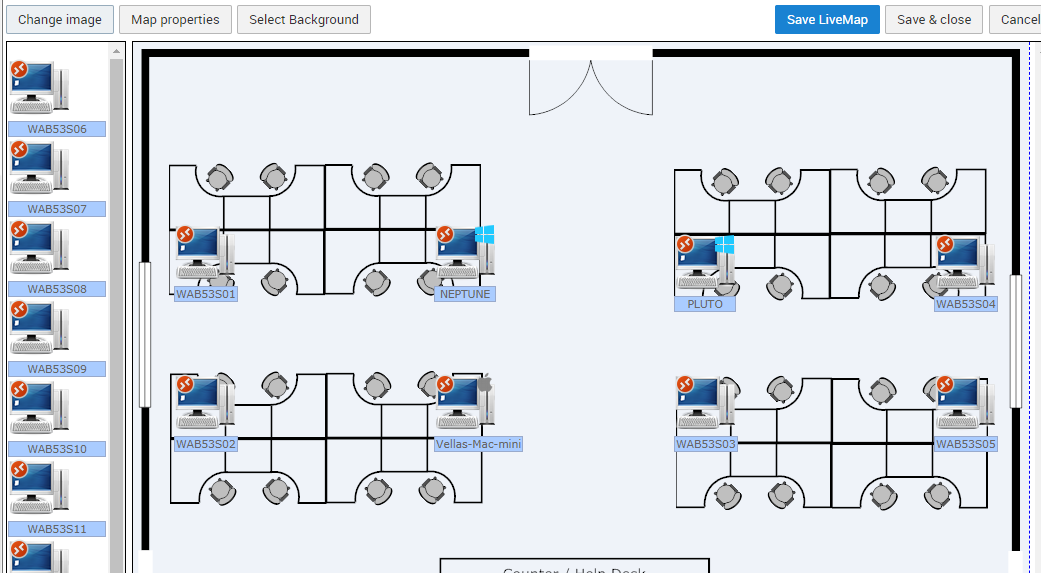
The LiveMap editor: place the room's stations on the floor plan. - If you configured a room with only selected stations available for remote access, those stations show a red remote connection icon in the upper-left corner of the computer image.
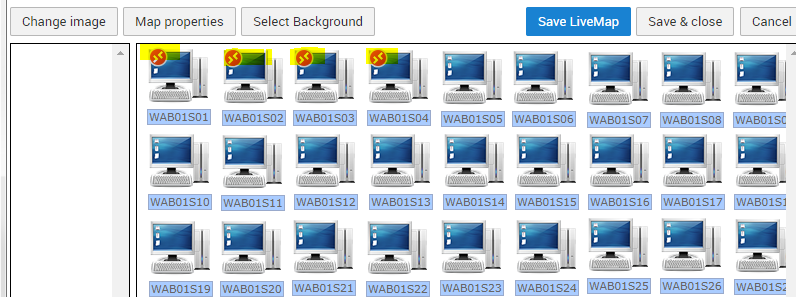
Only the selected stations (WAB01S01 to WAB01S04) carry the remote connection icon.
Connecting to Windows PCs in Your Lab
Windows has a built-in RDP client that connects directly to lab PCs running Windows. After clicking an available station, users get an RDP file downloaded to their computer. Double-clicking that file opens a new connection to the target computer. Users enter their credentials when prompted to start the remote session.
macOS and iOS users connecting to Windows computers need RDP software. Examples of software your users might need:
- Microsoft Remote Desktop for Mac
- Microsoft Remote Desktop for iOS
- Microsoft Remote Desktop for Android devices
Connecting to Macs in Your Lab
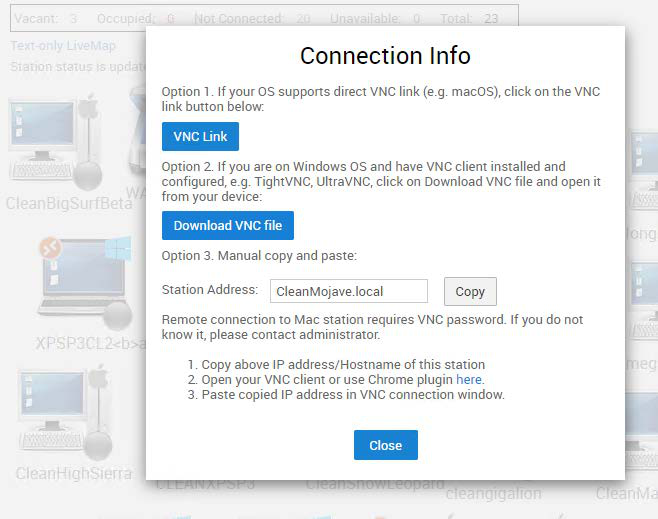
Computers with macOS use the VNC protocol, so devices connecting to lab Macs must have VNC client software installed and configured. The built-in VNC server supports two methods of authentication and authorization. The first method uses username/password authentication, but not all clients support it. The Connection Info window offers three options:
- VNC Link. If the connecting client supports it, for example macOS Screen Sharing, bVNC Pro for iOS or bVNC Free for Android, use the VNC Link button.
- Download VNC file. When connecting from Windows, we recommend the TightVNC or UltraVNC client. This method uses the VNC password for authorization, which is embedded in the Download VNC file option.
- Manual copy and paste. In all other cases, for example with the RealVNC client, copy the connection string, open the VNC client on your device and paste it. With this option you need to get the VNC password from your lab administrator.
VNC client for Android devices: bVNC Free on Google Play.
Reporting a Bug
Found a bug? Please report it to support@veralab.com. Thank you for using VeraLab and for taking the time to send us your feedback!
Related
Remote access works with VeraLab self-service sign-in and the Student Portal LiveMaps. See also the FAQ on remote access, the VDI and multi-session environments guide, the VeraLab overview and all documentation.